After posting several water marble designs on my instagram page, I’ve received a lot of questions about how to do it. So this post will be all about water marbling and I will try to answer most of your questions c: I’m not an expert or anything, so everything is just my opinion and things I’ve found has worked for me ^^
First of all, you need to know what water marbling is. It’s a technique where you drip drops of nail polish onto the surface of the water. You then make a pattern and dip your nail/nails in to transfer the pattern to your nail/nails.
Here you can see some of the different looks you can create with this technique 😀
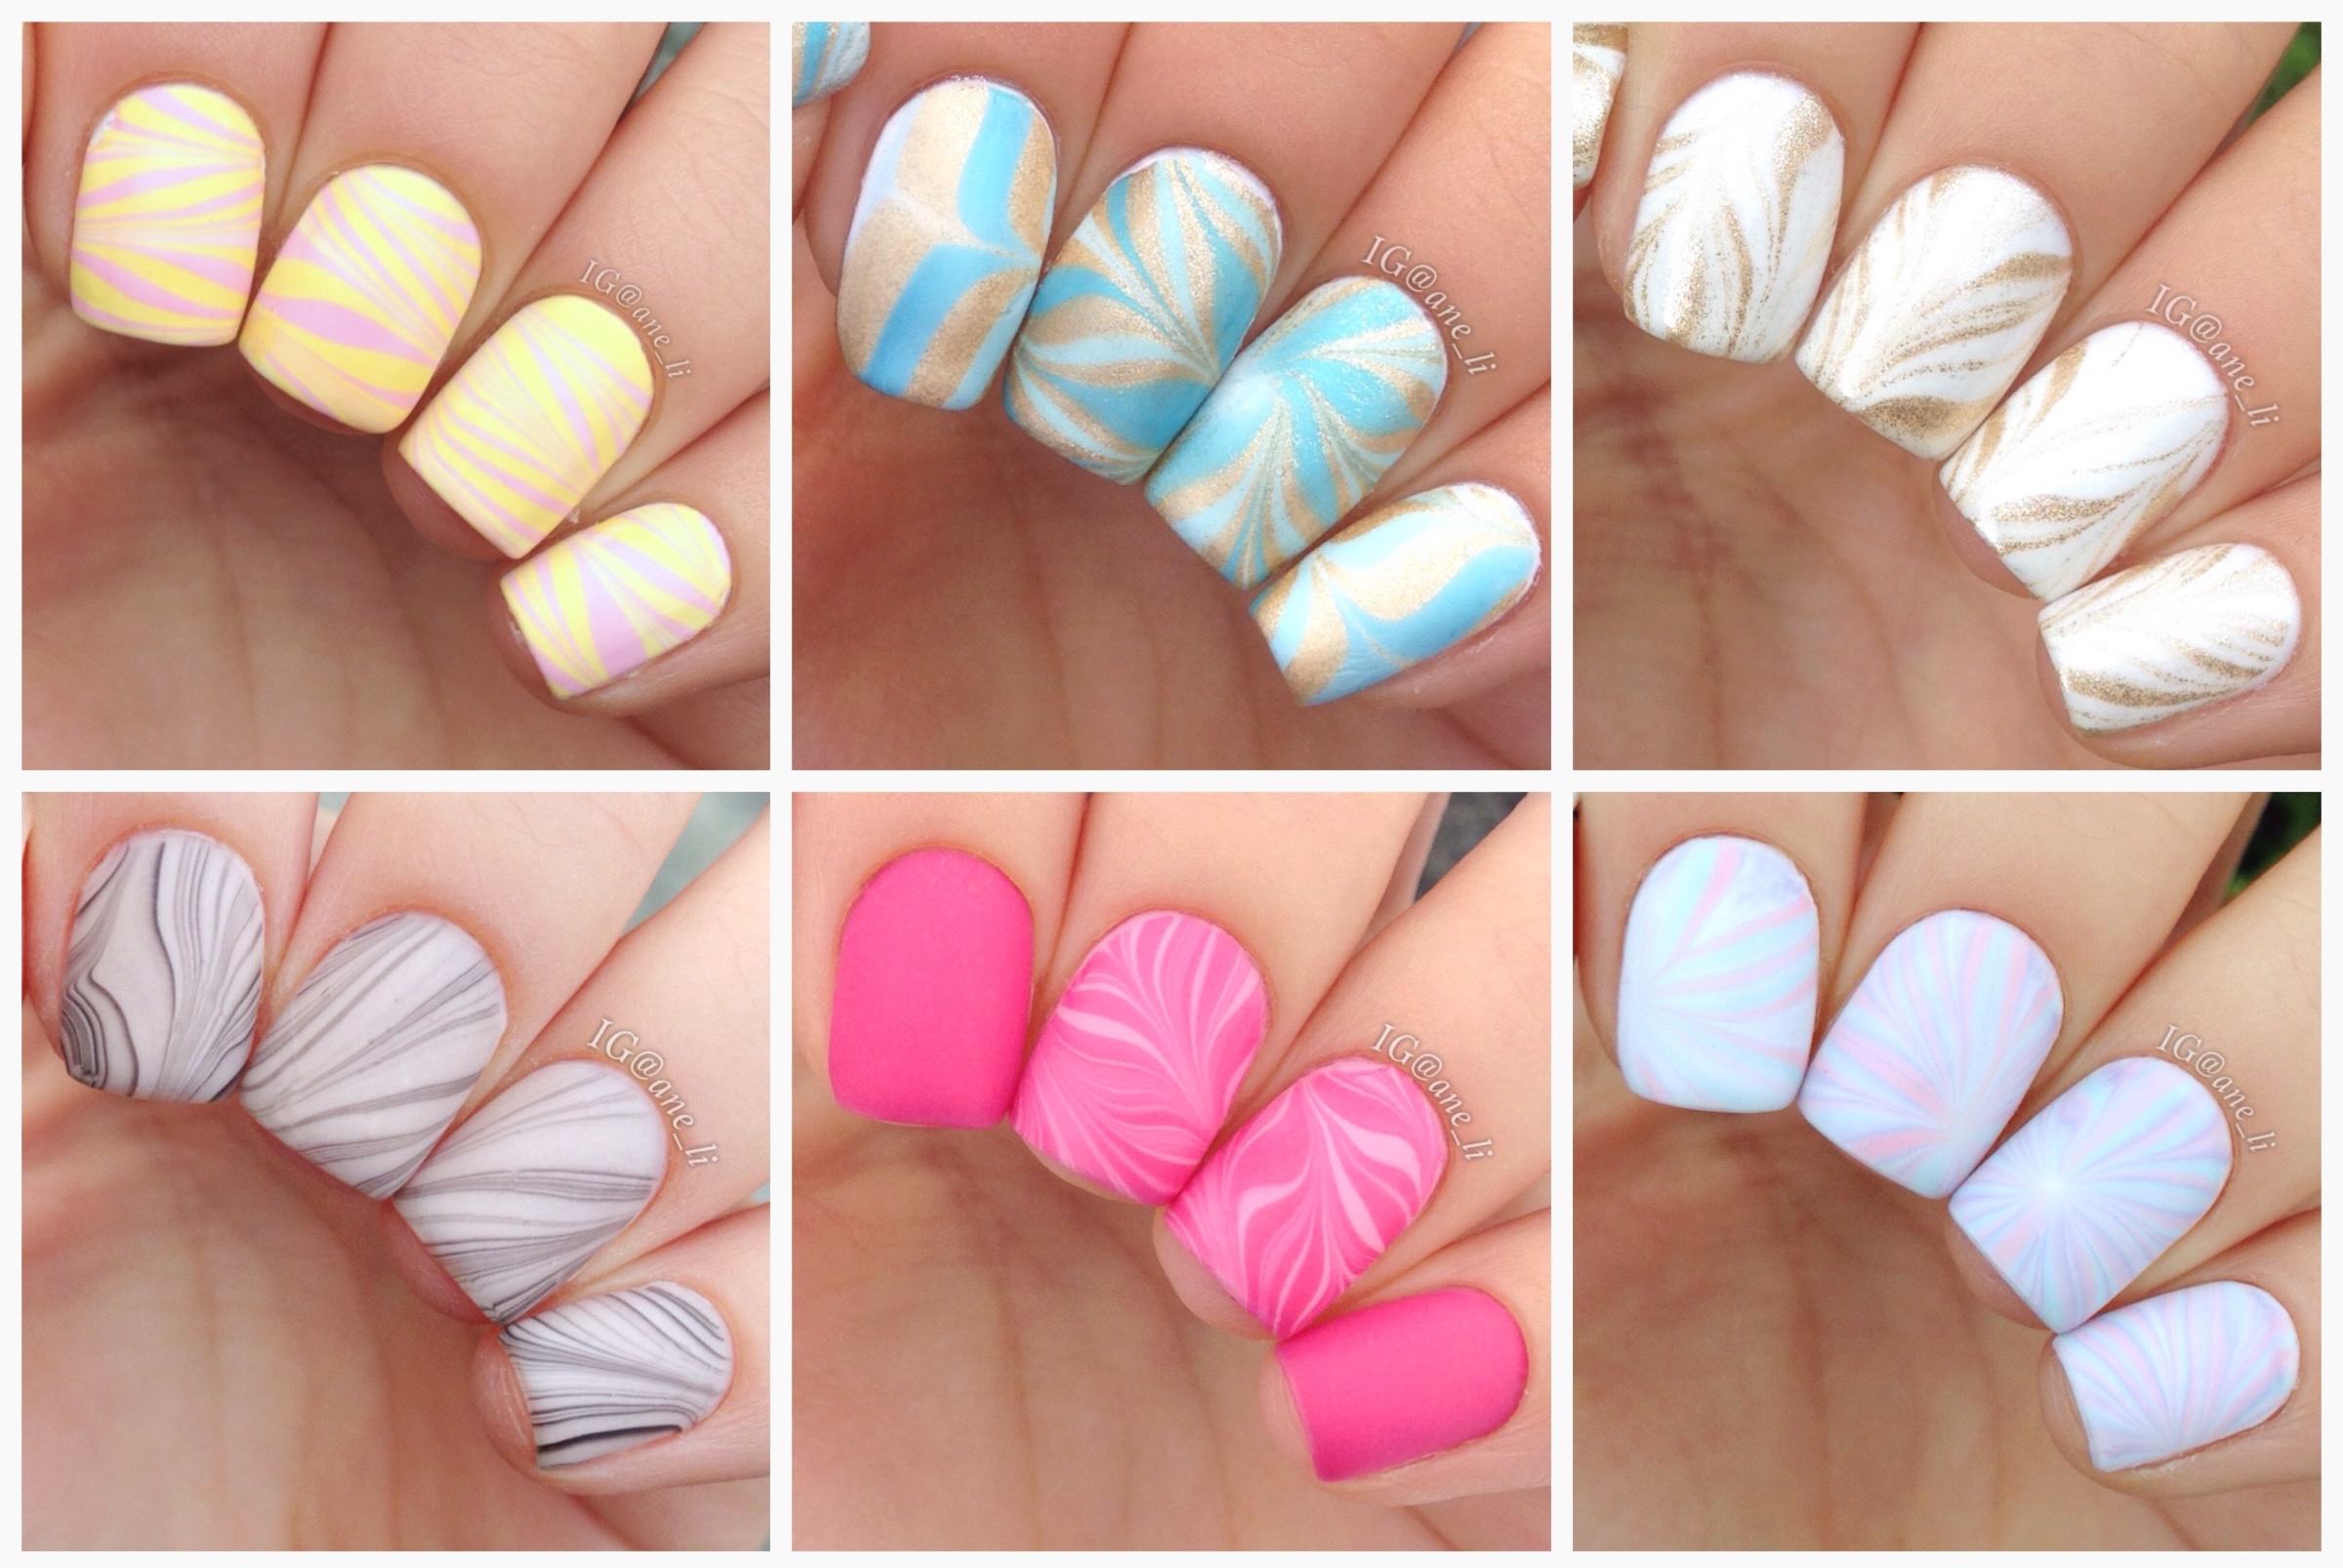
Top left: Polishes used: OPI don’t know the name, but I think it’s “Pink Friday” and Sally Hansen Xtreme Wear “Mellow Yellow”. They worked great together and spread well. I used white as my base and dipped more than one finger at the time, except for my index finger. I’m not sure why I did it..but I think it was to make the 15 sec tutorial look “neater” cx
Top middle: Polishes used: Sally Hansen Xtreme Wear “Marine Scene”, “Blizzard Blue” and “Golden-I”. I used white as my basecolor. These polishes work really well for water marbling. There’s a tutorial further down this post
Top right: Polishes used: China Glaze “Dandy Layin’ Around” and Sally Hansen Xtreme Wear “Golden-I”. These polishes worked great together too. I used “Dandy Layin’ Around”as my base, and I dipped all fingers at once.
Bottom left: Polishes used: OPI “Bubble Bath” and “Black Onyx”. I used “Bubble Bath” as my basecolor. All fingers dipped in at the same time.
Bottom middle: Polishes used: OPI “Strawberry Margarita” and “Chic From Ears To Tail”. I used “Chic From Ears To Tail” as my basecolor. These two polishes worked great together and were easy to work with! I dipped both fingers at the same time.
Bottom right: Polishes used: OPI “Gargantuan Green Grape” (the blue formula), “You’re Such A Budapest” and I don’t know the name of the pink one, but I think it’s “Pink Friday” by OPI. “Gargantuan Green Grape” and “You’re Such A Budapest” worked really good together and spread well. The pink one however had begun to get thick, so it kinda ruined it a bit. (It’s the same pink as the one in the top left one on the picture, but this one was made almost a year after, so that’s why it didn’t work as good) I probably should’ve used “Chic From Ears To Tail” for this one too. I dipped one nail at the time and I used the white polish “Divinely Made” by Pink Princess Cosmetics as by basecolor.
Here’s a tutorial I made a while ago :3
What you need:
- A cup or bowl of room temperature water. I’ve heard that you shouldn’t use a plastic cup because the polish might dissolve it, and you obviously wouldn’t want that. About the temperature of the water, everybody keeps saying how important it is, but I honestly don’t really understand why, because I’ve used both slightly warm and cold water, and it has worked just fine. But I think maybe it’s just that the water and polish should be the same temperature or something like that cx Also, I just use tap water but tap water is different from country to country. I live in Norway and it works just fine. I recommend experimenting a bit with different water (tap, bottled or filtered) before starting out. Another thing is the size of your cup/bowl. I recommend using one that’s big enough to dip more than one finger at the time, but it shouldn’t be too big either. If it’s too big, the polish will dry faster and that makes everything a lot harder..
- Base coat, base color and topcoat. Most of the time, a white base is best. But if you’re using different shades of the same color, I would use the lightest shade as my base.
- Some polishes, at least two. New polishes and polishes that have a thin, runny formula works best. Some brands that has worked for me are: opi, essie, china glaze, sally hansen xtreme wear, maybelline color show and some cheap polishes from h&m. Polishes that has begun to thicken or become gooey won’t work. Also, if the polish doesn’t spread within a few seconds, it’ll most likely not work.
- Tape, vaseline or peel off basecoat for easier cleanup. This is optional, but highly recommended as water marbling leaves a lot of polish on your skin. If you’re using vaseline, just rub it on the skin around your nail but make sure to not get any on the actual nail. If using tape, you’ll need a pair of scissors to make the removal easier. An alternative to a peel off basecoat is liquid palisade or you make mix white glue with water.
- A toothpick/needle/orange stick/cocktail stick to make the pattern
- Some toilet paper or paper towel to wipe your tool on
- Q-tips + flat brush + polish remover for cleanup
Steps:
- Gather everything you need. (See the list above)
- Apply you base coat and basecolor, let dry. If your basecolor isn’t smooth, you should apply a layer of topcoat to smoothen it out.
- Mask your nails with either tape, peel off basecoat or vaseline.
- Unscrew all the nail polish bottles.
- Make your bullseye.
- Start making your pattern. Make sure to wipe off your tool after each “swirl” for a cleaner look. Work fast, so the polish doesn’t dry.
- Carefully dip your nails in. Blow on the surface to make the polish dry faster.
- Remove excess polish from the surface with a toothpick.
- Slowly pull your finger(s) out of the water.
- Allow it to dry for a couple of minutes.
- Clean up around your nails.
- Apply topcoat!
A few tips & tricks:
– When making the design, stay away from the outer rings. They dry first and if you touch them, you might ruin the whole design.
– Hold the brush close to the surface when dropping the polish. If it’s to high above the water surface, the polish might just sink to the bottom.
– Dip the toothpick straight down and pull it up to get clean lines.
– Work as fast as you can.
– Push back your cuticles just before dipping you nails in the water. I don’t know how to explain why you should do it..but just do it cx
– Dip more than one finger at once to save polish